I haven't posted for way to long! In the next couple weeks, I am planning a blog over haul. New posts, new layout, maybe a new name?? It defiantly time for some blog TLC!
Please check back for updates and hopefully I will get this going in the next couple of weeks.
Tuesday, April 2, 2013
Friday, November 2, 2012
Pumpkin!!!!
I have been a complete failure in the blogging department. Life has gotten ahead of me and I have neglected my blogging duties. To make it up, I have not one but two recipes for you! Both involved the deliciousness known as pumpkin. At even the remotest signs of fall, I am all about the pumpkin. Lattes, muffins, pies, cupcakes, candles, pasta anything that has pumpkin in it, I will eat. The two recipes that follow take one can of pumpkin so you don't end up with extra laying around.
First up is pumpkin pancakes. I've been making pancakes from scratch for a long time, I don't even remember the last time I used a mix. People over estimate the difficulty of doing things from scratch. Pancakes are one of the easiest things to make and it only takes a couple more minutes to make them from ingredients you probably already have at home. The best part is you can experiment with the batter and make tons of yummy flavor combinations.
This particular recipe hails from one of my favorite blogs, Annie's Eats. All of the recipes I've tried from this site are great. Always easy to follow and delicious to eat!
Pumpkin Pancakes

1 1/4 cups flour
2 tbsp. brown sugar
2 tsp. baking powder
1/4 tsp. salt
3/4 tsp. ground cinnamon
1/4 tsp. ground nutmeg
Dash of ground ginger
Dash of ground cloves
1 cup milk
1/2 cup canned pumpkin
1 large egg
2 tbsp. melted butter
1. Mix flour, brown sugar, baking powder, baking soda, salt, and spices in a large bowl. Use a whisk to break up any lumps.
2. In a separate bowl beat the egg. Next add the pumpkin, milk, and butter and mix till combined.
3. Pour liquid mixture into the flour mixture and whisk together. Stop when the batter is just combined, some lumps are ok but not too many.
4. Heat frying pan or griddle to a medium. Spray with cooking spray if you are not using a nonstick surface. Pour about 1/3 a cup of batter on to the pan. The batter is pretty thick so you may want to spread the batter out a little bit. Flip when bubbles start to appear in the surface of your pancake. Once flipped NEVER SQUISH THE PANCAKE DOWN. I repeat NEVER SQUISH THE PANCAKE DOWN. If you want fluffy pancakes resist the urge. After this side is browned, remove from pan. Repeat till out of batter.
5. Top with cinnamon sugar or syrup or both and enjoy!
Now that you've made pancakes, you've still got half a can of pumpkin left. What to do, what to do? Cupcakes of course!
This recipe also comes from a great blogger, Brown Eyed Baker. I have to say this is by far the best pumpkin cupcake/ muffin recipe I have ever tried. They were moist, spiced just right, and completely delicious. I highly recommend this recipe to anyone and everyone.
Pumpkin Cupcakes w/ Cream Cheese Frosting

Cupcakes (makes about 18):
2 cups flour
1/2 tsp baking soda
1/2 Tbsp + 1/2 tsp baking powder
1/2 tsp salt
1 tsp ground cinnamon
1/2 Tbsp ground ginger
1/2 tsp nutmeg
1 pinch ground cloves
1/2 cup (1 stick) unsalted butter, room temperature
1 1/4 cups packed light-brown sugar
2 large eggs
1/2 cup buttermilk
3/4 cup canned pumpkin
1. Preheat oven to 350 degrees. Line a cupcake pan with liners or grease which ever you prefer. Whisk together flour, baking soda, baking powder, salt, and spices.
2. Beat the butter and sugar together until it becomes light a fluffy. Add the eggs one at a time and beat until combined. Next add the flour mixture in three separate batches, mixing in the buttermilk in between each addition of the flour. Finally, beat the pumpkin in to the mixture until combined. The batter will be very thick. Don't freakout this is how it is supposed to be.
3. Fill the cupcake liners 2/3s of the way up. Bake for 10 minutes, rotate the pans, and bake for an additional 10 minutes or until a toothpick can be inserted and removed cleanly. Let the cupcakes cool in the pan for 10 minutes before removing.
Frosting:
1/2 cup (1 stick) butter (room temp)
1 8oz package cream cheese (room temp)
2 1/4 cups powdered sugar
1/4 tsp vanilla extract
1. Beat butter and cream cheese together until smooth.
2. Add powdered sugar a little bit at a time until frosting becomes fluffy. Beat in vanilla extract.
3. Once cupcakes are completely cooled frost and enjoy!!
First up is pumpkin pancakes. I've been making pancakes from scratch for a long time, I don't even remember the last time I used a mix. People over estimate the difficulty of doing things from scratch. Pancakes are one of the easiest things to make and it only takes a couple more minutes to make them from ingredients you probably already have at home. The best part is you can experiment with the batter and make tons of yummy flavor combinations.
This particular recipe hails from one of my favorite blogs, Annie's Eats. All of the recipes I've tried from this site are great. Always easy to follow and delicious to eat!
Pumpkin Pancakes

1 1/4 cups flour
2 tbsp. brown sugar
2 tsp. baking powder
1/4 tsp. salt
3/4 tsp. ground cinnamon
1/4 tsp. ground nutmeg
Dash of ground ginger
Dash of ground cloves
1 cup milk
1/2 cup canned pumpkin
1 large egg
2 tbsp. melted butter
1. Mix flour, brown sugar, baking powder, baking soda, salt, and spices in a large bowl. Use a whisk to break up any lumps.
2. In a separate bowl beat the egg. Next add the pumpkin, milk, and butter and mix till combined.
3. Pour liquid mixture into the flour mixture and whisk together. Stop when the batter is just combined, some lumps are ok but not too many.
4. Heat frying pan or griddle to a medium. Spray with cooking spray if you are not using a nonstick surface. Pour about 1/3 a cup of batter on to the pan. The batter is pretty thick so you may want to spread the batter out a little bit. Flip when bubbles start to appear in the surface of your pancake. Once flipped NEVER SQUISH THE PANCAKE DOWN. I repeat NEVER SQUISH THE PANCAKE DOWN. If you want fluffy pancakes resist the urge. After this side is browned, remove from pan. Repeat till out of batter.
5. Top with cinnamon sugar or syrup or both and enjoy!
Now that you've made pancakes, you've still got half a can of pumpkin left. What to do, what to do? Cupcakes of course!
This recipe also comes from a great blogger, Brown Eyed Baker. I have to say this is by far the best pumpkin cupcake/ muffin recipe I have ever tried. They were moist, spiced just right, and completely delicious. I highly recommend this recipe to anyone and everyone.
Pumpkin Cupcakes w/ Cream Cheese Frosting
Cupcakes (makes about 18):
2 cups flour
1/2 tsp baking soda
1/2 Tbsp + 1/2 tsp baking powder
1/2 tsp salt
1 tsp ground cinnamon
1/2 Tbsp ground ginger
1/2 tsp nutmeg
1 pinch ground cloves
1/2 cup (1 stick) unsalted butter, room temperature
1 1/4 cups packed light-brown sugar
2 large eggs
1/2 cup buttermilk
3/4 cup canned pumpkin
1. Preheat oven to 350 degrees. Line a cupcake pan with liners or grease which ever you prefer. Whisk together flour, baking soda, baking powder, salt, and spices.
2. Beat the butter and sugar together until it becomes light a fluffy. Add the eggs one at a time and beat until combined. Next add the flour mixture in three separate batches, mixing in the buttermilk in between each addition of the flour. Finally, beat the pumpkin in to the mixture until combined. The batter will be very thick. Don't freakout this is how it is supposed to be.
3. Fill the cupcake liners 2/3s of the way up. Bake for 10 minutes, rotate the pans, and bake for an additional 10 minutes or until a toothpick can be inserted and removed cleanly. Let the cupcakes cool in the pan for 10 minutes before removing.
Frosting:
1/2 cup (1 stick) butter (room temp)
1 8oz package cream cheese (room temp)
2 1/4 cups powdered sugar
1/4 tsp vanilla extract
1. Beat butter and cream cheese together until smooth.
2. Add powdered sugar a little bit at a time until frosting becomes fluffy. Beat in vanilla extract.
3. Once cupcakes are completely cooled frost and enjoy!!
Sunday, August 5, 2012
Olympics!!!
I have caught a major case of olympic fever. Every 2 years when the olympics roll around I spend hours watching sports that I have no clue the rules of and cheer on Team USA and Great Britain. And when I say hours, I mean HOURS, like 12 a day. I avidly avoid any website that shares olympic results before they are aired on tv. I have cried, I have screamed, I have laughed, and I have cheered. I now know all the rules of road cycling as well as race walking. You get the point, I LOVE the olympics. So when Annelih suggested olympic themed dishes for this weeks post I was on board!
After all the sweets I've been eating, baking really wasn't on the cards. I thought about doing something British but nothing really felt right. In the end I went with something healthy, delicious, and summery; quinoa fruit salad.
Quinoa is a super grain that, while being delicious, is packed with protein. It cooks just like rice and can be eaten both hot and cold. To give my quinoa an olympic flare I added fruit in the color of the olympic rings; blueberries for blue, mangos for yellow, blackberries for black, kiwi for green, and strawberries for red. For a little extra something, I added something toasted coconut and honey lime dressing.

Olympic Quinoa Salad
2 cups cooked quinoa cooled to room temp
handful of strawberries cut up
handful of blueberries
handful of blackberries
1 mango cubed
2 kiwis cubed
1/2 cup unsweetened shredded cocoanut toasted
juice of one lime
2 tbsp honey
1. In a bowl mix together the quinoa, strawberries, blueberries, blackberries, mango, kiwi, and cocoanut.
2. In a separate bowl whisk together the lime and honey. Pour over fruit salad and mix.
3. Serve, eat, and enjoy!
After all the sweets I've been eating, baking really wasn't on the cards. I thought about doing something British but nothing really felt right. In the end I went with something healthy, delicious, and summery; quinoa fruit salad.
Quinoa is a super grain that, while being delicious, is packed with protein. It cooks just like rice and can be eaten both hot and cold. To give my quinoa an olympic flare I added fruit in the color of the olympic rings; blueberries for blue, mangos for yellow, blackberries for black, kiwi for green, and strawberries for red. For a little extra something, I added something toasted coconut and honey lime dressing.
Olympic Quinoa Salad
2 cups cooked quinoa cooled to room temp
handful of strawberries cut up
handful of blueberries
handful of blackberries
1 mango cubed
2 kiwis cubed
1/2 cup unsweetened shredded cocoanut toasted
juice of one lime
2 tbsp honey
1. In a bowl mix together the quinoa, strawberries, blueberries, blackberries, mango, kiwi, and cocoanut.
2. In a separate bowl whisk together the lime and honey. Pour over fruit salad and mix.
3. Serve, eat, and enjoy!
Friday, August 3, 2012
Summer Cocktail
So, I completely failed this week. I missed our weekly group blog post. :( Although I'm four days late, I have a great summer cocktail for you all!
Annelih posted a recipe for mango pineapple rum punch which looks delicious! Rum always makes me think of summer. All those fruity cold drinks with little umbrellas in them!
Cassie did a Spanish wine drink called Tino de Verano. It looks super refreshing and is pretty simple to make. I'll adding it to my "took make" pile.
For my summer cocktail, I was planning on making a basil martini but Publix didn't have any basil, sad day. Instead, I went with what I had in the fridge. Strawberries, mint, ginger ale, and gin. It may sound like a strange combination but it was delicious, trust me!

3 sliced strawberries
4 mint leaves
1tsp sugar
1 shot of gin
Ginger ale
1. Muddle the strawberries, mint, and sugar in the bottom of a tall glass. (I just used a spoon and smashed it all together )
2. Add gin, a couple of ice cubes, and top off glass with ginger ale.
3. Stir, sip, and enjoy! (don't spill half on the couch like I did)
Sunday, July 22, 2012
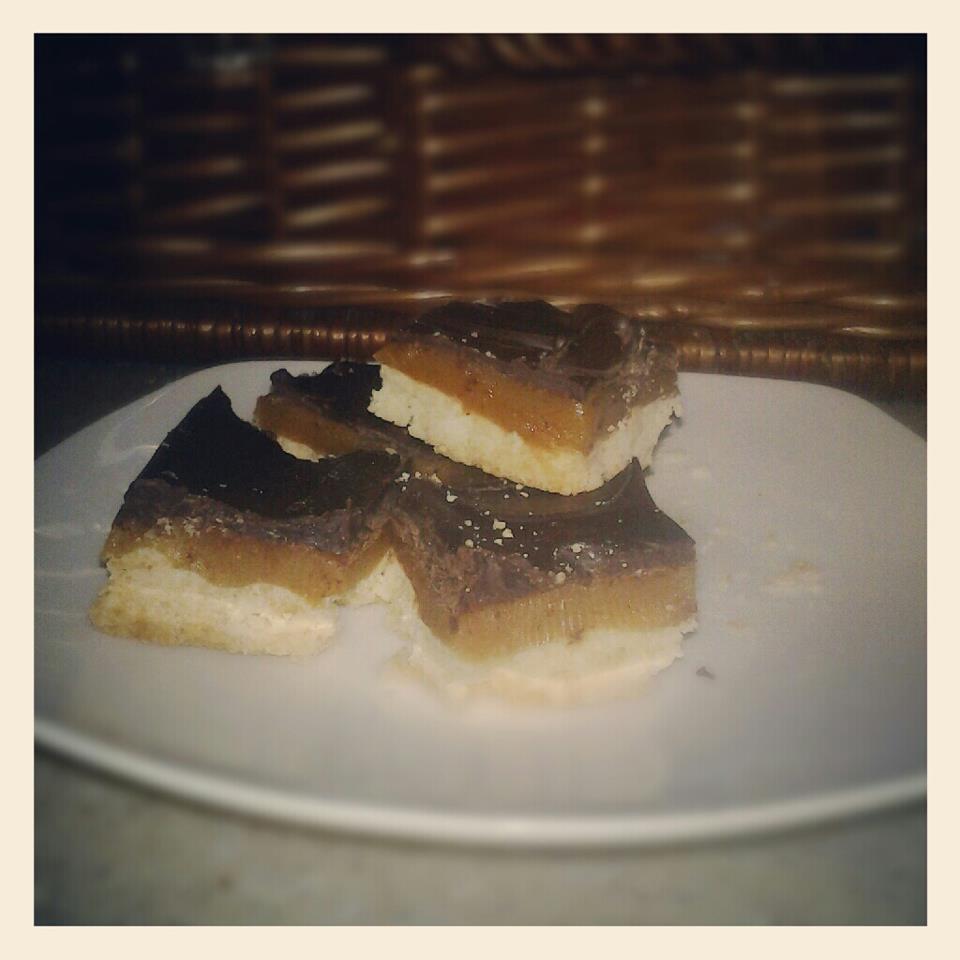
homemade twix bars!!!!
WARNING: These are extremely addictive! Make at the risk of your own waistline!
Thats right. Homemade delicious cookie with caramel and chocolate twix bars. I have always wanted to make these ever since I saw them on one of my favorite blogs, cupcakes and cashmere. The idea of making caramel is slightly terrifying. Burning, molten sugar that has the potential harden into a rock and stick to every corner of everything is really appealing (not).
I thought I could face my fears with some help, so I suggested to Cassie and Annelih we make them for our weekly blogging adventure. They agree and so the mission began!
Check out Annelih's twix bars here and Cassie's isn't up yet but she's got an awesome scone recipe for now and I'll post her twix when she gets it up. (Update: heres cassie's! and hers doesn't involve making your own caramel for those of you who want a simpler recipe)
Heres my attempt. They turned out really well! Like I can no longer make them because I eat the entire thing in three days well. I"m warning you, make these for a party or for company, your waistline will thank me!

Homemade Twix Bars
Cookie:
1 stick plus 3 tbsp unsalted butter
1/4 cup sugar
1 3/4 cups flour
1/4 tsp salt
Caramel:
3/4 cup unsalted butter
1/2 cup sugar
1/4 cup dark corn syrup
1- 14oz can sweeten condensed milk
1/2 tsp salt
Chocolate layer:
10 oz dark chocolate
1. Cream sugar and butter together for cookie layer. Add salt and flour a little bit at a time, the mixture will be crumbly. Press mixture into a 13 X 9 in pan that has been lined with parchment paper. Make sure the layer is level to ensure even cooking.
2. Bake at 350 degrees for 10 minutes and then rotate pan. Bake for another 12 minutes until golden brown. Remove and allow time to cool.
3. While cookie layer is baking and cooling make the caramel. In a large sauce pan, mix together butter, sugar, corn syrup, milk, and salt for the caramel. Place on low-medium heat and stir constantly. When the sugar has dissolved, turn the heat to medium-high heat. Continue stirring to avoid burning. Once the mixture begins to boil, turn the heat back down to low-medium. Stir for another 10 minutes until the caramel becomes thicker and begins to pull away from the sides. Pour over cookie layer and let cool.
4. Once the caramel is cool, put into fridge. Fill a sauce pan with about an inch of water in the bottom with a glass bowl on top. The glass bowl should not touch the water but should be big enough to sit on top of the pan without touching the bottom. Put the sauce pan on medium heat and bring the water to a simmer. (this is a double boiler!) Place chocolate in the glass bowl and stir until melted.
5. Remove caramel cookie thing from the fridge. Pour the chocolate over the top and spread in an even layer. Refrigerate until chocolate is set.
6. Slice and enjoy!!! (sprinkle with a little salt for an extra treat)
Thats right. Homemade delicious cookie with caramel and chocolate twix bars. I have always wanted to make these ever since I saw them on one of my favorite blogs, cupcakes and cashmere. The idea of making caramel is slightly terrifying. Burning, molten sugar that has the potential harden into a rock and stick to every corner of everything is really appealing (not).
I thought I could face my fears with some help, so I suggested to Cassie and Annelih we make them for our weekly blogging adventure. They agree and so the mission began!
Check out Annelih's twix bars here and Cassie's isn't up yet but she's got an awesome scone recipe for now and I'll post her twix when she gets it up. (Update: heres cassie's! and hers doesn't involve making your own caramel for those of you who want a simpler recipe)
Heres my attempt. They turned out really well! Like I can no longer make them because I eat the entire thing in three days well. I"m warning you, make these for a party or for company, your waistline will thank me!
Homemade Twix Bars
Cookie:
1 stick plus 3 tbsp unsalted butter
1/4 cup sugar
1 3/4 cups flour
1/4 tsp salt
Caramel:
3/4 cup unsalted butter
1/2 cup sugar
1/4 cup dark corn syrup
1- 14oz can sweeten condensed milk
1/2 tsp salt
Chocolate layer:
10 oz dark chocolate
1. Cream sugar and butter together for cookie layer. Add salt and flour a little bit at a time, the mixture will be crumbly. Press mixture into a 13 X 9 in pan that has been lined with parchment paper. Make sure the layer is level to ensure even cooking.
2. Bake at 350 degrees for 10 minutes and then rotate pan. Bake for another 12 minutes until golden brown. Remove and allow time to cool.
3. While cookie layer is baking and cooling make the caramel. In a large sauce pan, mix together butter, sugar, corn syrup, milk, and salt for the caramel. Place on low-medium heat and stir constantly. When the sugar has dissolved, turn the heat to medium-high heat. Continue stirring to avoid burning. Once the mixture begins to boil, turn the heat back down to low-medium. Stir for another 10 minutes until the caramel becomes thicker and begins to pull away from the sides. Pour over cookie layer and let cool.
4. Once the caramel is cool, put into fridge. Fill a sauce pan with about an inch of water in the bottom with a glass bowl on top. The glass bowl should not touch the water but should be big enough to sit on top of the pan without touching the bottom. Put the sauce pan on medium heat and bring the water to a simmer. (this is a double boiler!) Place chocolate in the glass bowl and stir until melted.
5. Remove caramel cookie thing from the fridge. Pour the chocolate over the top and spread in an even layer. Refrigerate until chocolate is set.
6. Slice and enjoy!!! (sprinkle with a little salt for an extra treat)
Monday, July 16, 2012
Quiche
Since then I have started experimenting a little more with my quiche filling. The combinations are endless. Once you know how to make a basic quiche, you can put whatever you want inside! For this quiche, I used stuff I already had in my fridge; goat's cheese, tomato, basil, and onions.

Goat's Cheese, Caramelized Onion, Tomato, and Basil Quiche
1 pie case (I used the left over pastry from my apple pie for the crust but frozen will do)
5 eggs
1/2 cup heavy cream
1/2 cup milk
1 onion
1 large tomato, sliced
goats cheese
3 basil leaves
1. Slice the onion and cook in a pan at medium-low heat with a little bit of oil. Cover the onions and leave them, stiring occasionally until they turn a carmel color. Add a pinch of salt and remove from heat.
2. Whisk the eggs, milk, and cream together in a bowl, add a pinch of salt and pepper. Chop the basil and add it into the mixture.
3. Using a fork, prick the bottom of your pie case. Spread the onions at the bottom of the crust. Place small pieces of goat cheese on top of the onions as well as the slices of tomato. Pour the egg mixture on top of it all.
4. Bake in a preheated 365 degree oven for 35-40 minutes. Remove when the center is fully cooked. Use a toothpick to test if needed. Let cool for at least an hour.
5. Slice, eat, and enjoy!!
** The pie crust, eggs, milk, and cream are all you need for a basic quiche so get creative and make your own combinations and flavors!
Saturday, July 14, 2012
Chocolate Orange bread
Ok, so for this weeks group bloggingness we decided to make bread. I decided what a perfect time to make yeast bread for the first time! Days later, in a flour covered kitchen, I ended up with a heavy lump of kind of bake terrible bread. I failed, epically. Sometime in the future I will post a beautiful picture of some steaming, perfect french bread but for now yeast bread will be on hold.
That being said I needed something for group blog day (ps we need a name, any suggestions?). Both Annelih and Cassie were making sweet quick breads. I decided to follow their trend and googled quick bread recipes. In my searches, I came across orange chocolate bread. I was sold! Orange and chocolate is one of my favorite combinations ever!
Check out Cassie's Chocolate Almond Bread and Annelih's Peanut Butter Bread they both look amazing! I'm going to have to try those recipes out for myself!
Orange Chocolate Bread

1 orange
2 cups flour
1 cup sugar
1 tsp baking powder
1/2 tsp baking soda
1/2 tsp salt
1 egg
2 tbsp butter, melted
1 tsp vanilla extract
1 cup semi-sweet chocolate chips
1. Zest and juice the orange. Combined he juice and add boiling water until it equals 1 cup. Pour over the zest and let sit for 10 minutes.
2. Combined flour, sugar, baking powder, baking soda, and salt in a large bowl. In a separate bowl beat the egg, butter, vanilla, and orange mixture together. Add the liquid to the dry and mix until just moist. Fold in the chocolate chips.
3. Pour mixture into a greased bread pan. Bake at 350 degrees for 60-70 minutes. Check the center with a toothpick and remove from oven when the center is cooked.
4. Cool, slice, and enjoy!
Subscribe to:
Posts (Atom)